
Introduction
We often talk about State Management but rather little about the notion of State Restoration.
This notion, often ignored, can be quite important in certain types of applications in order to provide comfort to users and avoid any frustration related to potentially having to restart what they had just done as a result of the application being put into background... by the receipt of a simple phone call, for example...
This article explains why to use, how it works and how to implement State Restoration.
Impact of backgrounding your application
Suppose you were finalizing an order as well as the form that had taken you 2 minutes to complete, you were about to press the "Send" button and you get a phone call.... Your app goes into the background during your phone call, and when you come back to your app, your shopping cart is empty, and so is your form.... Wow... the frustration.
It's important to know that when your application is put into the background, whether as a result of a user action or involuntarily, when receiving a phone call, for example, your application may be terminated by the operating system in order to free up resources. When this happens and your application returns to the foreground, it restarts from square zero.
What is State Restoration?
The State Restoration is a mechanism that allows you to ensure that certain data is automatically saved when the application is set to background and can be retrieved when the application is restarted.
By data we mean not only values but also parts of the user interface (Route, TextFields, Scrolling...) that help give users the impression that the application has never been killed.
To make this possible, your application must follow certain rules and thus be defined for this purpose from the beginning.
Let's see how to achieve this step by step.
Preliminary configuration for your tests
In order to be able to test the State Restoration during your developments, it's essential to make sure that your application will be killed by the OS as soon as you put it in the background.
Here's how to do it, depending on whether you're working on Android or iOS.
Android
On Android, whether on a real phone or a simulator, it's pretty straightforward.
Put the phone or simulator in Development mode.
a. Open the application "Settings"
b. Enter the "About phone / About emulated device"
c. Then in the "Software information"
d. Locate the "Build number" and press 7 times in a row.
After the 7 presses, you'll see a message informing you that your phone has switched to "Development" mode. A new "Developer options" menu is added to the application "Settings"
Enter the "Developer options" menu
a. Scroll to the end and locate the "Applications" group ("Apps")
b. Enable the "Don't keep activities" option
iOS
For iOS, this requires more preparation at XCode level. Please refer to this guide for the iOS part: State Restoration on iOS.
I find it much easier to test State Restoration on Android than on iOS.
Therefore, I highly recommend that you use an Android phone or Android simulator when developing on a Mac and wish to test your State Restoration implementation.
How does it work in broad terms?
Before we get into the details of how, it's nevertheless interesting to understand the general mechanism of how it works.
1. Operation in 'foreground' mode.
At the end of a Frame (rendering), ALL data (*) related to the State Restoration that have been the subject of a modification, are serialized and sent to the Engine (flutter/restoration) which puts them in cache until the OS asks for them.
(*) in fact these are the Buckets but we'll see all that in detail, later.
Serialization and sending to the Engine are synchronous operations.
It is therefore important to limit the update frequency, the quantity and the size of the data that are part of this operation in order not to create 'jank'.
2. When the Operating System terminates the application
When the application is running in the background and IF the Operating System decides to terminate the application in order to free up resources, the OS will ask the Engine to provide the latest version of the data to be saved. Once done it terminates the application.
It should be noted that the size of data that can be saved is limited to a few K-bytes (*)
(*) despite extensive research, I have not been to find any precise limits
3. Restarting the application
On restart of an application that is designed for State Restoration (*), data is retrieved from the Engine in a synchronous manner. Rendering of the application can then begin.
(*) we'll see how to prepare the application and when rendering actually starts later.
4. Rendering application components
During State Restoration, as components (Widgets...) are rendered, the data linked to them (we'll see how later) is retrieved and "applied", which has the objective and consequence, of reconstructing the arborescence of the Widgets and, in part (I'll explain later), the visual content.
At the end of this operation, the visual appearance of the application should have been restored and the user can continue to use the application "as if nothing had happened".
Hot Reload, Hot Restart, Cold Start
Simple remark before further down into the matter.
The notion of State Restoration does not apply during a Hot Reload, a Hot Restart or a Cold Start of the application.
In other words, any changes to the structure of your code relating to the notion of restoration are not "taken into account" during a Hot Reload. For your modifications to be taken into account, you'll need to stop and restart your application.
I repeat: on "Cold Start" of an application, the State Restoration does NOT apply.
The State Restoration only applies to applications that have been terminated by the OS, which is why I use the term "Restart".
It's quite confusing at first...
Now that the broad outlines have been defined, it's high time to see how to put all this together...
What are the "main components"?
Let's start by looking at the main components, involved in the State Restoration.
RestorationManager (the "coordinator")
The RestorationManager is the coordinator. It is unique in any Flutter application.
It is started as soon as the Bindings are initialized (see Flutter Internals). It handles all communications with the Engine with regard to State Restoration. It is also responsible for the management of the "data" to be sent to the Engine at the end of the next Frame Rendering.
RestorationScope (the "isolation")
Visualize a RestorationScope as a way to structure your application by self-contained restoration blocks, hence the suffix "~Scope".
A RestorationScope is a Widget that can itself contain other RestorationScope among its descendants. Each RestorationScope descendant is independent of its ancestors.
The RootRestorationScope
The very first in the hierarchy is the RootRestorationScope, as its name suggests and should normally be unique within an application.
It is generally positioned as early as possible in the Widgets tree, as soon as the notion of restoration can make sense. It is therefore quite common to find it (but not obligatory) around the runApp() as illustrated below:
void main(){
    runApp(
        const RootRestorationScope(
            restorationId: 'root',
            child: Application(),
        ),
    );
}
It is a special RestorationScope in that it is the one that prepares your application to support State Restoration.
Well, other things still need to be done but, thanks to the presence of a RootRestorationScope, the mechanism for recovering data saved at OS level is set up and the creation of the Root RestorationBucket is carried out.
The RestorationScope
As mentioned above, the RestorationScope is a Widget whose sole purpose is to define a new isolated "area" (or Scope) of restoration and allow retrieval of the main RestorationBucket related to this "area".
At its creation, a RestorationBucket is initialized and inserted into the Widgets tree, via a specialized InheritedWidget, called UnmanagedRestorationScope.
The identity of a RestorationScope is ESSENTIAL and is mentioned via its property: restorationId.
A RestorationScope whose identity is not mentioned (= null) disables the 'State Restoration' for its entire subtree.
This can be useful in some transitional cases, but in most cases you won't need to use this special feature.
Personal note:
It's a pity that the property that is used to define the behavior is called restorationId or restorationScopeId and not enabled as this would have made the explanations easier, as you'll see later.
Is the RootRestorationScope essential?
It depends.
You should know that when you use a MaterialApp or a CupertinoApp, a RootRestorationScope is automatically inserted.
So, if no data needs to be restored upstream, simply mentioning a restorationScopeId at MateriaApp/CupertinoApp level activates the State Restoration and so a prior RootRestorationScope is not necessary.
.On the other hand, if you were to retrieve session data, such as: language, currency, theme to be able to initialize your MateriaApp/CupertinoApp, then, you need a RootRestorationScope upstream.
ULTRA important!
If you have a RootRestorationScope upstream, you MUST mention a restorationScopeId at the level of your MateriaApp/CupertinoApp, because, as mentioned earlier, an absence of an identity disables the State Restoration for the entire subtree!!!
The RestorationBucket (the "memory")
As its name suggests the RestorationBucket is a place where information is stored that is exchanged between your application and the OS as part of the State Restoration.
A RestorationBucket is nothing more than a class that:
- has a unique name for the same RestorationScope (we'll see later)
- stores information (the RestorableProperty) in the format as Map<Object?, Object?>, in other words, a series of pairs: key - value
- knew its position in the tree structure: parent - children
While nothing prevents you from doing so, in general, you don't directly manipulate RestorationBuckets but delegate this to the RestorationMixin.
The RestorableProperty (the "data")
Finally, here are the last elements, the RestorableProperty, that is, the data used by the State Restoration.
The following diagram lists the different types of data that are "restorable" and provided for as basic by Flutter. You should already know that nothing prevents you from creating your own types (we'll see how to do this later).
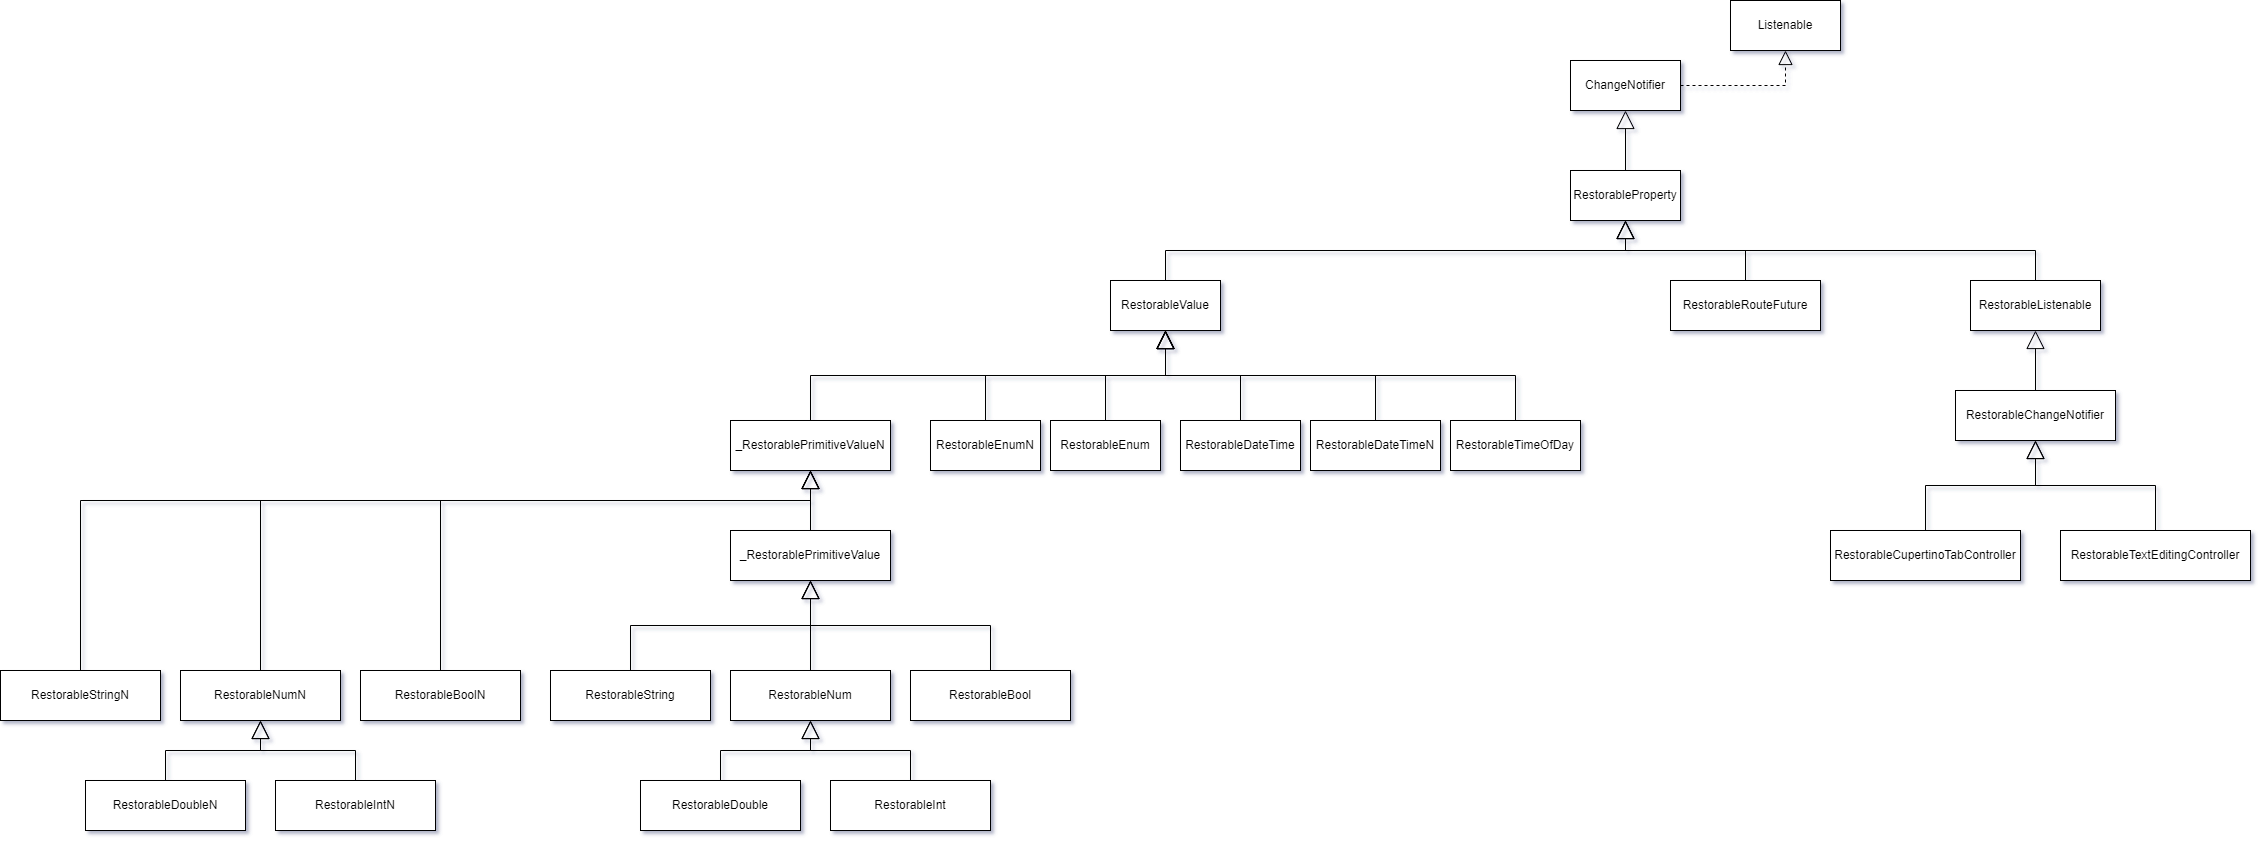
As you can see, a RestorableProperty is a ChangeNotifier. This is used by the RestorationMixin to know when a property has been changed and when it needs to be updated at the RestorableBucket level.
Must we systematically use a RestorableProperty to save/restore data?
No.
You can use any type of data without any problem nevertheless, there are 2 advantages to using RestorableProperty:
- You use a mixin that takes care of all the complexity involved in managing RestorationBucket and when it's necessary to "save" or "retrieve" this data.
- Thanks to the use of a RestorableProperty, it is much easier to identify which data is part of the process.
What are the basic supported data types?
The following table draws a parallel between data types and their equivalent restorable.
| Type | Restorable |
|---|---|
| String | RestorableString |
| String? | RestorableStringN |
| int | RestorableInt |
| int? | RestorableIntN |
| double | RestorableDouble |
| double? | RestorableDoubleN |
| num | RestorableNum |
| num? | RestorableNumN |
| bool | RestorableBool |
| bool? | RestorableBoolN |
| Enum | RestorableEnum |
| Enum? | RestorableEnumN |
| DateTime | RestorableDateTime |
| DateTime? | RestorableDateTimeN |
| TimeOfDay | RestorableTimeOfDay |
Other types of RestorableProperty exist, but you won't be using them very often. For the sake of completeness, here they are:
- RestorableRouteFuture
- RestorableCupertinoTabController
- RestorableTextEditingController
State Restoration in practice
Now that we know the State Restoration players, it's time to see how to use them together.
Simple case - l'application "counter"
To get started, let's start with the basic application: the "counter" and adapt its code so that it supports State Restoration.
    import 'package:flutter/material.dart';

    void main() {
      runApp(const RootRestorationScope(
        restorationId: 'root',
        child: MyApp(),
      ));
    }

    class MyApp extends StatelessWidget {
      const MyApp({super.key});

      @override
      Widget build(BuildContext context) {
        return MaterialApp(
          title: 'Restorable Counter',
          restorationScopeId: 'application',
          theme: ThemeData(
            colorScheme: ColorScheme.fromSeed(seedColor: Colors.deepPurple),
            useMaterial3: true,
          ),
          home: const MyHomePage(),
        );
      }
    }

    class MyHomePage extends StatefulWidget {
      const MyHomePage({super.key});

      @override
      State<MyHomePage> createState() => _MyHomePageState();
    }

    class _MyHomePageState extends State<MyHomePage> with RestorationMixin<MyHomePage> {
      final RestorableInt _counter = RestorableInt(0);

      void _incrementCounter() {
        setState(() {
          _counter.value++;
        });
      }

      @override
      Widget build(BuildContext context) {
        return Scaffold(
          appBar: AppBar(
            backgroundColor: Theme.of(context).colorScheme.inversePrimary,
            title: const Text('Restorable Demo'),
          ),
          body: Center(
            child: Column(
              mainAxisAlignment: MainAxisAlignment.center,
              children: <Widget>[
                const Text(
                  'You have pushed the button this many times:',
                ),
                Text(
                  '${_counter.value}',
                  style: Theme.of(context).textTheme.headlineMedium,
                ),
              ],
            ),
          ),
          floatingActionButton: FloatingActionButton(
            onPressed: _incrementCounter,
            tooltip: 'Increment',
            child: const Icon(Icons.add),
          ),
        );
      }

      @override
      String? get restorationId => 'counter_page';

      @override
      void restoreState(RestorationBucket? oldBucket, bool initialRestore) {
        registerForRestoration(_counter, 'counter');
      }
    }
Explanations:
- lines 4-5: We define the RootRestorationScope and give it a name (as I told you before, in this example we didn't need to insert one, but it's simply to make it more "visible" in terms of explanations)
- line 17: As we've seen, we also need to give a restoration name to a MaterialApp
- line 35: We include the RestorationMixin to help us
- line 36: Instead of using an int, we use its restorable version RestorableInt and initialize it to 0
- line 40: Incrementing takes place at its "value"
- line 59: We retrieve its value
- lines 73-74: We give a name to the RestorationBucket relative to our StatefulWidget that uses the state restoration.
- line 78: We inform the RestorationMixin that the RestorationInt is part of the properties to be saved/restored.
As you can see, it wasn't necessary to make a huge number of changes to make the code compatible.
What about Routes?
Any self-respecting application is not limited to a single "page" and the user will navigate through the application and open "pages" (= Route).
It is therefore also necessary to be able to save these Routes in order to restore them on restart.
Flutter has provided for this possibility and offers variations on the usual Navigator.of(context).xxx():
| Non-Restorable | Restorable |
|---|---|
| .pushNamed<T>(...) | .restorablePushNamed<T>(...) |
| .pushReplacementNamed<T>(...) | .restorablePushReplacementNamed<T>(...) |
| .popAndPushNamed<T>(...) | .restorablePopAndPushNamed<T>(...) |
| .pushNamedAndRemoveUntil<T>(...) | .restorablePushNamedAndRemoveUntil<T>(...) |
| .push<T>(...) | .restorablePush<T>(...) |
| .pushReplacement<T>(...) | .restorablePushReplacement<T>(...) |
| .pushAndRemoveUntil<T>(...) | .restorablePushAndRemoveUntil<T>(...) |
| .replace<T>(...) | .restorableReplace<T>(...) |
| .replaceRouteBelow<T>(...) | .restorableReplaceRouteBelow<T>(...) |
Of course, only methods relating to adding or modifying the list of routes are taken into consideration. Removing a route (pop) does not require the route to be saved, as it is no longer there.
So, if you want a page to be restored on startup, use the restorablexxx<T>(...) methods.
Here's an example:
class BasketPage extends StatefulWidget {
    const BasketPage({super.key});

    @override
    State<BasketPage> createState() => _BasketPageState();

    //
    // Static Routing
    //
    static Route<Object?> restorableRoute(BuildContext context, Object? arguments) {
        return BasketPage.route();
    }

    static Route<void> route() => MaterialPageRoute(
            settings: BasketPage.routeSettings,
            builder: (BuildContext context) => const BasketPage(),
        );
    static RouteSettings routeSettings = const RouteSettings(name: '/basket_page');
    }

    class _BasketPageState extends State<BasketPage> {
        ...
    }

        //
        // Code to push the new Route
        //
        Navigator.of(context).restorablePush<void>(BasketPage.restorableRoute);
Creating a specific type
Suppose you want to store session data in a specific class instance. Since this isn't a basic supported type, how do you go about it?
To illustrate the case, let's look at the code and additional explanations will follow:
class ApplicationSession extends ChangeNotifier {
    String? _language;

    String? get language => _language;

    set language(String? value){
        if (value != _language){
            _language = value;
            notifyListeners();
        }
    }

    // -------------------------------
    // Serialization
    // -------------------------------
    Map<String, dynamic> toJson() => {
        "language": _language,
        };

    // -------------------------------
    // Deserialization
    // -------------------------------
    void loadFromJson(Map<String, dynamic> json) {
        _language = json["language"] as String?;
    }
}

class RestorableApplicationSession extends RestorableListenable<ApplicationSession> {
    // ---------------------------------------------------------------------
    // Called at cold start up of the application to define a default value
    // ---------------------------------------------------------------------
    @override
    ApplicationSession createDefaultValue() {
      // Let's simply return the default value
      return ApplicationSession();
    }

    // ------------------------------------------------------------------
    // Called when the application resumes so that we have to restore
    // the initial state
    // ------------------------------------------------------------------
    @override
    ApplicationSession fromPrimitives(Object? data) {
      final Map<String, dynamic> savedData = Map<String, dynamic>.from(data as Map<Object?, Object?>);

      // We set a new instance
      final ApplicationSession session = ApplicationSession();

      // and initialize it with the restored values
      session.loadFromJson(savedData);

      return session;
    }

    // ------------------------------------------------------------------
    // Called after EITHER createDefaultValue() OR fromPrimitives(...)
    // or at any time a new "value" has been provided by the RestorationMixin
    // Any previous "content" should be replaced by the new "value"
    // IMPORTANT -- If we override this method:
    //    As the internal ".value" is initialized by the RestorableListenable
    //    we absolutely need to invoke the super.initWithValue(value)
    // ------------------------------------------------------------------
    @override
    void initWithValue(ApplicationSession value) {
      super.initWithValue(value);
      // Do whatever you want to do with the instance
    }

    // ------------------------------------------------------------------
    // Called when we need to save the status to allow potential
    // restoration.  Also called after initialization is done.
    // ------------------------------------------------------------------
    @override
    Object? toPrimitives() {
      // Serialization
      return value.toJson();
    }

    // ------------------------------------------------------------------
    // Called when we need to dispose the instance
    // ------------------------------------------------------------------
    @override
    void dispose() {
      // Free up resource, if necessary
      super.dispose();
    }
}
The following table summarizes the life cycles of our RestorableApplicationSession:
| Cold start | Restart |
|---|---|
| 1. createDefaultValue | 1. fromPrimitives |
| 2. initWithValue | 2. initWithValue |
| 3. toPrimitives | - |
The following code shows in an ultra-simplistic way how to use this new type:
void main(){
    runApp(
        const RootRestorationScope(
            restorationId: 'root',
            child: const Application(),
        ),
    );
}

class Application extends StatefulWidget {
    const Application({super.key});

    @override
    State<Application> createState() => _ApplicationState();
}

class _ApplicationState extends State<Application> with RestorationMixin {
    late RestorableApplicationSession restorableApplicationSession;

    // ------------------------------------------------------------------
    // Unique identifier of the RestorationBucket
    // ------------------------------------------------------------------
    @override
    String get restorationId => 'application';

    // ------------------------------------------------------------------
    // Initializes or restores the RestorableProperty used by this State
    // ------------------------------------------------------------------
    @override
    void restoreState(RestorationBucket? oldBucket, bool initialRestore) {

    // Let's initialize the type
    restorableApplicationSession = RestorableApplicationSession();

    // Tell the system that this instance is part of the State Restoration
    registerForRestoration(restorableApplicationSession, 'restoration_application_session');
    }

    ...
}
Nothing else is required in order to integrate this new data type into the restoration mechanism.
You've almost certainly noticed that I didn't instantiate the RestorableApplicationSession directly but used a "late" and that the initialization took place at the level of the restoreState(...) method. Why and is it necessary to do this?
To be able to understand exactly why I did it, we now need to take a look at the RestorationMixin and analyze how everything works.
How does the RestorationMixin work?
If you remember, a RestorationScope simply defines a restoration block isolated from the others. Nothing else.
To be able to save/retrieve data, you need to use RestorationBucket and this is where the RestorationMixin comes in.
The RestorationMixin is responsible for managing the RestorationBucket within the direct RestorationScope to which the StatefulWidget belongs.
1. restorationId
The RestorationMixin requests a UNIQUE restorationId (or a null value) for the RestorationScope direct to which the Widget belongs.
If the restorationId is not null, the RestorationMixin instantiates a RestorationBucket which will be identified by this restorationId.
Data related to THAT Widget and part of the backup/restoration will be saved in THAT bucket.
a. Importance of restorationId being unique
Why is it important for restorationId to be unique?
Simply because
There can NOT be 2 RestorationBuckets with the same name within a RestorationScope.
This uniqueness constraint is important. Therefore, if you have several instances of the same StatefulWidget within the same RestorationScope, you'll need to make sure you use a unique and constant name, as the restorationId will be used as an identifier when saving data, and reused to identify the "owner" of the data when restoring!!!
Tip for multi-instantiable StatefulWidget.
Add a property to your StatefulWidget to control their restorationId and avoid hardcoding the restorationId within the StatefulWidget.
Prefer this kind of signature in order to have better control over the restorationId.
class MyRestorableMultiInstantiableWidget extends StatefulWidget {
    const MyRestorableMultiInstantiableWidget({
        super.key,
        this.restorationId,
        ...
    });

    final String? restorationId;
    ...
}
If it should ever happen to you that it is not possible to know in advance whether 2 instances of Widgets carry the same restorationId within the same RestorationScope, nothing prevents you from creating a new area by inserting a RestorationScope, like this:
@override
Widget build(BuildContext context){
  return Column(
    children: [
      MyRestorableMultiInstantiableWidget(
        restorationId: 'myRestorationId',
      ),
      RestorationScope(
        restorationId: 'zone2',
        child: MyRestorableMultiInstantiableWidget(
          restorationId: 'myRestorationId',
        ),
      ),
    ],
  );
}
As you can see, thanks to having added a RestorationScope, we have created a segmentation that allows me to use the same restorationId.
b. restorationId as activation/deactivation flag
As mentioned above, the same property name "restorationId" is used for RestorationScope and RestorationBucket, which is a shame as it can lead to confusion.
As a reminder, a restorationId that is null is equivalent to disabling restoration.
For a RestorationScope, deactivation takes place at the tree structure started by the RestorationScope.
For a RestorationMixin, deactivation is limited to the StatefulWidget, only.
2. restoreState(...)
Among the methods added by the RestorationMixin, we'll find the restoreState(...) which is called just after the initState().
This is where you mention (and save) the list of RestorableProperty linked to the StatefulWidget instance.
Typical example of use:
@override
void restoreState(RestorationBucket? oldBucket, bool initialRestore) {
    // Let's initialize the type
    restorableApplicationSession = RestorableApplicationSession();

    // Tell the system that this instance is part of the State Restoration
    registerForRestoration(restorableApplicationSession, 'restoration_application_session');
}
It is important to remember that the "registerForRestoration" method is executed synchronously by the mixin and that it will be at the end of this execution that the content of the RestorableProperty will either be initialized or restored, as the case may be.
This explains why
It is generally considered good practice to instantiate all RestorableProperty at the restoreState(...) level in order to be able to manage their potential interdependencies but also other dependencies.
3. StatefulWidget - workflow change
Here's what the "start" workflow looks like for a StatefulWidget that makes use of State Restoration.
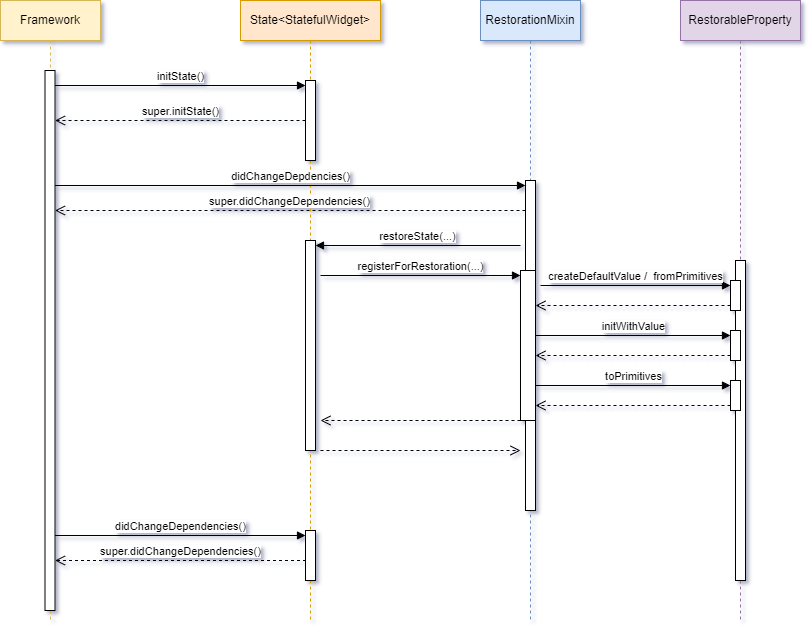
Of course, this considers the fact that you respect and call the super.initState() and super.didChangeDependencies() immediately as intended by the framework, that is:
@override
void initState(){
  super.initState();
  // Other initializations
}

@override
void didChangeDependencies(){
  super.didChangeDependencies();
  // Other initializations
}
4. The RestorationMixin is listening...
When you register a RestorableProperty via the registerForRestoration(...) method, the RestorationMixin will start "listening" for changes that might be applied to the RestorationProperty content. This explains why RestorableProperty are ChangeNotifier.
This also explains why:
- any new type of RestorableProperty must refer to a ChangeNotifier
- it's important that you call the dispose() for each RestorationProperty you instantiate.
So, why is it important to know that the mixin is listening?
This is thanks to the fact that the mixin reacts to changes in the contents of the RestorableProperty, that their "value" is saved.
Here's how...
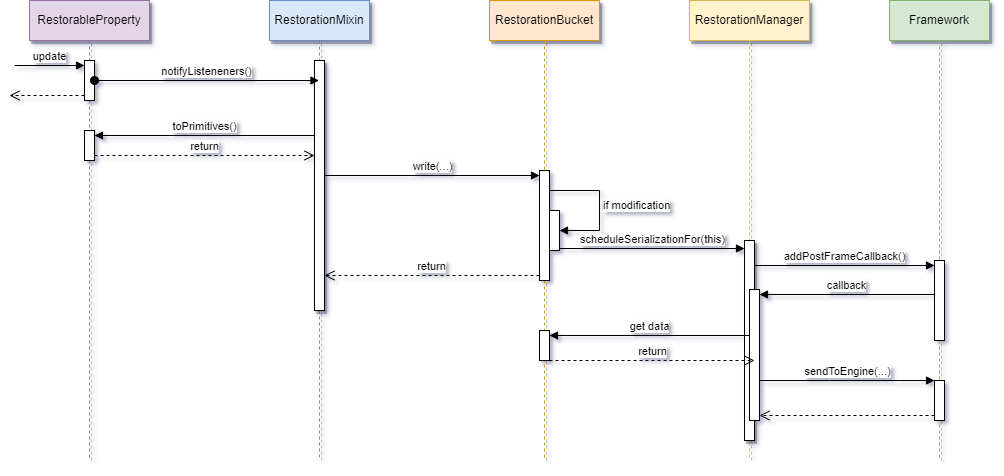
In clear:
- When the content of a RestorableProperty is modified, it notifies all its listeners, including the RestorationMixin.
- The latter retrieves the new content and stores it at the RestorationBucket.
- This warns the RestorationManager that at the end of the next Frame Rendering, it will be necessary to send an update of the data to be restored to the Engine.
Frame Rending (the "trigger")
As we have just seen, saving the data (i.e., sending it to the Engine) is done at the end of the next Frame Rendering.
In 99.9% of cases, we don't need to worry about this however, there may be circumstances where we should modify a RestorableProperty outside of any layout refresh.
This is notably the case with the Scrollable where at the end of a scrolling activity the final scrolling position (offset) is determined between 2 frames, without having to plan a new one.
To cover this extremely rare case, the RestorationManager exposes a method for forcing this save and send to the Engine:
ServicesBinding.instance.restorationManager.flushData();
How to restore the complete layout
At the very beginning of this article, I told you that the size of data that can be saved was limited to a few K-bytes.
This means that you should limit yourself to essential data, and therefore not store all the information.
Suppose the user was in the middle of a product search displayed in an endless ListView. How can we make it look like the user is right back where he was?
Of course, we'll most certainly have saved his identifiers, his language, the search criteria, his scrolling position in the ListView and the key to the product for which he was looking at the details, but it's out of the question to have saved the list of products, their details, their photos, .... So how do you do it?
There's no one-size-fits-all solution, but here's a clue.
1. Identify complex restoration cases
When establishing the architecture of your application, it's important that you think about the case(s) where it would be complex to restore the user interface.
2. Restore mode or not?
How do you determine whether you're in "restore" mode or not?
As we'll see a little further on, from time to time it can be interesting to know whether you're in "restore" mode and to act accordingly.
The most obvious way is based on the existence of the restorationId. If this parameter is null, at least there's no room for doubt. On the other hand, its presence in itself means nothing.
The most obvious way is to check for the existence of a RestorableProperty in the RestorationBucket.
  @override
  void restoreState(RestorationBucket? oldBucket, bool initialRestore) {
    isRestoring = initialRestore && (bucket?.contains('oneOfMyRestorationId') ?? false);
    ...
  }
Although this is the most common way of doing things, there are cases where the restoration of a Widget would be postponed (by, for example not passing the restorationId directly but later). In this case, the restorationState method will not be called. So how do you go about it?
A trick I use from time to time is a "flag" that I position directly at the Root RestorationBucket and remove when my StatefulWidget is laid out.
If I am in "restoration" mode, this means that I didn't have time to remove this flag because the dispose() method hadn't been called. So, if this flag is present at root RestorationBucket level, it means I am in restoration mode.
Here is how I happen to implement it:
class _MyStatefulPageState extends State<MyStatefulPage> with RestorationMixin {
    final String _restorationFlagName = "flag_my_stateful_page";

    bool isRestoring = false;
    RestorationBucket? rootRestorationBucket;

    @override
    void initState() {
        super.initState();
        _determineIfInRestorationMode();
    }

    /// ------------------------------------------------------------------
    /// This routine SYNCHRONOUSLY validates whether we are in Restoration
    /// mode or not, via the presence of a certain flag in the
    /// Root RestorationBucket
    /// ------------------------------------------------------------------
    void _determineIfInRestorationMode() {
        //
        // Prevents the first Frame rendering
        //
        RendererBinding.instance.deferFirstFrame();

        //
        // Retrieve the Root RestorationBucket, if any
        //
        ServicesBinding.instance.restorationManager.rootBucket.then((RestorationBucket? bucket) {
          //
          // Save the RestorationBucket for later re-use
          //
          rootRestorationBucket = bucket;

          //
          // Check if the flag is present
          //
          final bool? flagPresence = bucket?.read(_restorationFlagName);

          //
          // If yes, this means that we are in Restoration mode
          //
          isRestoring = flagPresence == true;

          //
          // Otherwise, let's create the flag
          //
          if (isRestoring == false) {
              bucket?.write(_restorationFlagName, true);
          }

          //
          // Now, we can allow the frame rendering
          //
          RendererBinding.instance.allowFirstFrame();
        });
    }

    @override
    void dispose() {
        //
        // If we dispose the page, we no longer need the flag
        //
        rootRestorationBucket?.remove(_restorationFlagName);
        super.dispose();
    }
    }
I agree with you that this implementation is rather tricky... as it is imperative to know the mode at the level of the initState() and that I cannot wait for the didChangeDependencies() as the RestorationMixin will have already called the restoreState(...) (see above).
As the root RestorationBucket is an asynchronous function, and we know very well that restoring the root bucket has already taken place long ago, there is no risk at the level of the initState().
Since retrieving the root RestorationBucket is an asynchronous function, and we know for a fact that restoring the root bucket has already taken place at the time I am executing my code, in order to bypass this asynchronous call, I postpone the Frame Rendering during my verification, via the call to RendererBinding. instance.deferFirstFrame();.
As soon as I have my information, I re-enable the Frame Rendering via the call to RendererBinding.instance.allowFirstFrame();.
So, now I know what mode I am in, which allows me to make the "right" decisions about when to register RestorableProperties...
3. Registering RestorableProperty at the right time
Remember
The contents of RestorableProperties are restored at the time they are "registered" via the call to registerForRestoration(...).
Thus, if you restore them at the wrong time, you won't be able to do so (easily) later.
This is particularly the case with Scrollable whose position in a list would not be (re)set correctly because... your list would be empty at that moment. So how do you go about it?
Restore the RestorableProperty that give you the information you need to recompose complex data and POSTPONE the other RestorableProperty.
4. Recover "heavy"data
Once you've registered the RestorableProperty that lets you know the status of the data and NOT those that provide the display, you can start retrieving the 'heavy' data (for example, via calls to the server).
A good place to launch this function might be at the restoreState.
Here's an example:
  @override
  void restoreState(RestorationBucket? oldBucket, bool initialRestore) {
    restorableSearchCriteria = RestorableSearchCriteria();
    registerForRestoration(restorableSearchCriteria, 'restorable_search_criteria');

    //
    // Once we have the search criteria AND we are in restoration mode,
    // let's retrieve the items
    //
    if (isRestoring == true){
      unawaited(_fetchItemsFromServer(oldBucket, initialRestore));
    } else {
      _restoreStateLayoutRelated(oldBucket, initialRestore)
    }
  }

  void _restoreStateLayoutRelated(RestorationBucket? oldBucket, bool initialRestore){
    //
    // Proceed with the other registration
    //
    registerForRestoration(restorableStatus, 'restorable_status');
  }

  /// -------------------------------------------------------
  /// Restores the data from the server, then, once done,
  /// registers the RestorableProperty linked to the layout
  /// -------------------------------------------------------
  Future<void> _fetchItemsFromServer(RestorationBucket? oldBucket, bool initialRestore) async {
    //
    // Fetch the items from server, for example
    //
    ...

    //
    // Once done, retrieve the _RestorableProperty_ responsible for the layout (if any)
    //
    _restoreStateLayoutRelated(oldBucket, initialRestore);

    //
    // Here, most probably, we will have to force a rebuild but also to tell that you are no
    // longer restoring
    //
    if (mounted){
      setState((){
        isRestoring = false;
      });
    }
  }
5. Display lists only after everything has been retrieved
Since all Scrollables (ListView, GridView, SingleChildScrollView, ...) only save the scrollOffset, it becomes obvious that you can only display them once you've retrieved all the data so that repositioning is correct.
From then on, don't forget to use the isRestoring flag to make sure you only display these elements when the data is ready.
Before concluding
Before concluding, it's important to remember that Controllers, including AnimationController, are not saved at all.
More importantly...
Unfortunately, most plugins/packages don't support State Restoration!
I can't advise you enough to check which plugins/packages you're using if you want your application to fully support this notion of State Restoration.
Conclusion
Once again a long article and yet there would still be a lot to say especially about UnmanagedRestorationScope but you can perfectly use State Restoration without this additional knowledge...
I hope this article has served to demystify or simply introduce you to this important and so little-used notion, which is State Restoration.
Stay tuned for future articles and until then, happy coding!